|
At the point when the water pressure at a solitary faucet is low, the arrangement is often exceptional basic. Toward the finish of the faucet gush, there is typically a screw-on screen fitting, known as the aerator. Strikingly, numerous individuals don't even realize this fitting is there and often consider a handyman to make a fix that is as simple as anything a property holder will ever confront. 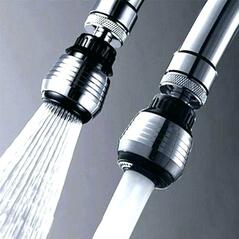 The motivation behind the aerator is to separate the strong stream of water and add air to the water flow. These faucet aerators often get clogged with developing and need to be cleaned to permit legitimate water flow. This is an incessant issue in regions where there is an overwhelming mineral substance to the water supply, for example, is often the situation in rustic territories served by groundwater wells.
Much of the time, basic cleaning of this aerator will work, however, at times, you may need to replace it. In either case, you should remove the aerator. For the most part, the aerator is in a bad way on hand-tight and can be unscrewed and removed effectively. In different cases, however, the development of mineral stores may solidify up the aerator and make it difficult to remove. What You Need
Instructions to Remove the Aerator Begin by endeavoring to unscrew it with your hand. Most faucet aerators are hand tight and commonly you can unscrew it by simply utilizing your hand. Make a point to get dry both the faucet and your hands first. If that does not work you will need to utilize a couple of pliers. If the aerator is in great condition and won't be replaced then you can utilize a cloth between the aerator and the pliers to prevent scratching. Or on the other hand, you can put masking tape on the jaws of your pliers to secure the chrome completion of the faucet aerator. A little pair of channel-type pliers works best for this. With the pliers, cautiously attempt and divert the counterclockwise as saw from the base turning upward. (If you are looking down at the faucet, you will turn it clockwise.) It does not move, take a stab at moving the pliers a quarter turn and cautiously take a stab at diverting the aerator from that point. Continue doing this forward and backward from the two positions. Try not to grasp the aerator too firmly, in light of the fact that the metal is delicate and will twist effectively, making your activity even more enthusiastically. If you are experiencing difficulty, you can have a go at showering entering oil, (for example, WD-40) on the strings and let it sit for some time before attempting once more. When introducing or reinstalling the aerator, screw it on simply hand tight at first. Test the faucet, and if it spills around the aerator, at that point fix it slightly further with channel-type pliers, making a point to utilize a cloth or masking tape to ensure the chrome of the aerator. Expectation so you individuals like this article and furthermore take in something from here about in what capacity can remove faucet aerators. You can use kohler faucet aerator for doing your job with hassle free.
0 Comments
Leave a Reply. |
Archives
February 2019
Categories |
 RSS Feed
