|
Let it be known, you've skipped sifting. Never? Truly??? Some shrewd bread cooks swear this progression is the key to light and fleecy cakes and cookies. Others take a "whatever" approach and prepare cheerfully on. Turns out that while skirting the sift most likely won't destroy your heated merchandise, there are in reality some quite valid justifications to incorporate this progression. 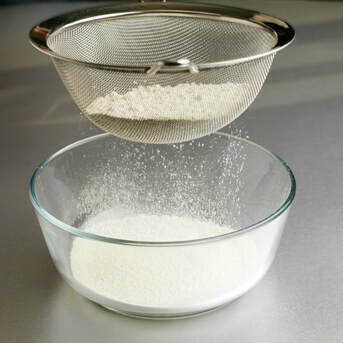 Why bother?
Accurate Measuring Contingent upon where you live, flour can pack pretty much amid capacity. In a sticky, tropical atmosphere, flour packs all the more thickly — that implies if you measure a measure of flour in Houston, it might really gauge in excess of glass should, diverting from the extents of the recipe by and large. The outcome? Dry and brittle heated merchandise loaded up with an excess of flour. Bellemain stainless steel flour sifter will give you an all the more even and reliable estimation, regardless of the atmosphere or surface of your flour. Note: A few recipes are more lenient than others when it comes to even estimations. But when all is said in done, the more sensitive the completed item, the more vital sifting is. So skipping sifting probably won't be a major ordeal for a thick scone, but it could improve things greatly in your light, fluffy cake. Aeration Here's the place sifting truly makes a major difference — it circulates air through the flour for a light, vaporous and fragile surface in your completed treats. It additionally separates bunches of flour, in light of the fact that those aren't enjoyable to chomp into. For cakes and cookies specifically, this progression can be the difference between an uneven, rough heated great and a carefully crumbed, proficient quality magnum opus. Removing debris We'll concede that it's uncommon to discover startling particles in your flour, but it's absolutely not feasible that a stray treat piece or perhaps a bug could discover its way in. Things occur. Try not to let them. Mixing Sifting flour with other dry ingredients, such as baking soft drink, salt or cocoa powder, is a decent method to guarantee they're truly very much blended. Sift and measure... what's the right order? It really depends! So check your recipe and continue likewise. If a recipe records the fixing and afterward says "sifted" ("2 containers flour, sifted"), at that point you should quantify the flour first, and afterward sift. If the recipe says "sifted" before the ingredients ("2 glasses sifted flour"), at that point you ought to sift the flour first and after that measure it. What tools do I require? A flour sifter — that doohickey with work screens and a pivoting sharp edge — is tidiest and enjoyable to utilize. But if you don't have one, a fine work sieve works fine and dandy. In any case, realize that sifting is continually going to spread a little flour around. That is exactly how it is. Using a sifter Fill the sifter around 3/4 full with flour and hold it over a bowl. Either delicately shake the sifter or turn the handle. The sifted flour will drift through the work screen and into your bowl. Using a sieve Place the sieve over a bowl. Empty flour into the sieve and blend with a spoon or spatula to urge the flour to go through. To get those last bits, hold the sieve with one hand and tenderly tap the edge of it with your other hand. Press any outstanding flour bumps through with your spoon if required.
0 Comments
It's the place you accumulate water to bubble for tea, wash off new creations from the ranchers' market, and defrost meals in a jiffy. It's the place your little ones wash their hands after offhand specialty evenings. What's more, odds are, more than one pet's sustenance or water bowl has been flushed around here.  It's the kitchen sink, and it sees a great deal of family unit activity. Ordinary errands, both nourishment related and something else, rely on it—so its neatness is basic. But as opposed to presenting your family to the brutal synthetic compounds found in ordinary sink cleaners, experiment with these common strategies. They'll securely keep your kitchen sink spiffy, shimmering, and all-around sterile:
1. Clean out your kitchen sink every day Day by day wipe-downs may sound extreme, but routine cleaning is the most ideal approach to keep germs from settling in any case. As we referenced in our article on the germiest spots in the normal home, sink strainer for kitchen are potential hot zones for infections. One examination uncovered 46% of kitchen sinks facilitated more than 100,000 microorganisms for each square centimeter. For correlation, the normal can situate 50 microbes—per square inch. Those germs stewing in your sink can incorporate E. coli and salmonella; not actually the perfect supper visitors. For day by day cleaning, utilize a delicate soap, water, and launderable cloth. After direct contact with a conceivably pathogenic item—e.g., crude chicken, or the previously mentioned puppy bowl—go one purification above and beyond. Prepare this all-normal splash and spritz away: Fill a jug with 1/2 container scouring liquor, 1/2 glass water, 1/2 tsp: Castile soap, and 10 drops of lemon fundamental oil. Let sit for a moment or two preceding cleaning dry. On the other hand, pursue similar bearings utilizing the delicate but viable Puracy Multi-Surface More clean. If conceivable, let your sink dry out between utilizations. Opening an adjacent window or setting up a sink-side fan are both simple approaches to accelerate the procedure. 2. Don't forget about drains and disposals "No longer of any concern" is a typical mentality in regards to what goes down the rubbish disposal. But leaving the unit unattended can cause microorganisms from old sustenance scraps to develop and raise a significant ruckus. Each time you run the disposal, you ought to at the same time have cold water running. Also, make certain to stack it up gradually—never hurl excessively in on the double. Like clockwork or something like that, pop a citrus-and-vinegar-ice-shape down it, à la this instructional exercise from Hi Sparkle. The vinegar disinfects the cutting edges, and the stimulating citrus strips repulse any waiting scents. Additionally, channels require a touch of consideration to counteract future issues. Keep them ensured with a deplete cover (which ought to be cleaned every now and again, as well). Got a stop up? Reconsider before going after the name mark deplete chemical, since it's regularly brutal on channels. Rather, here's how to recover your sink up and depleting. Bubble water in a vast pot, include a couple of squirts of dish soap and pour that down the deplete. For an additional lift, simply include salt—pour a large portion of a container down the deplete and flush with extra boiling water. These two strategies will get the sink clear without uncovering your dishes' command post to lethal synthetic substances. 3. Do dishes ASAP in the wake of cooking and eating Or possibly give them a speedy wash. Not exclusively will it make your cutlery simpler to clean later, but it likewise disposes of the microbes loaded natural issue that will in general draw in vermin. What's more, at whatever point conceivable, let your dishes air-dry as opposed to utilizing a kitchen towel. Between hand cleaning, drying the counter, and trying different dishes, tea towels are regularly incidental hosts to a wide range of microorganisms. 4. Pick the best dish brush and soap Set yourself up for sterile accomplishment by choosing the best devices for your dishwashing stockpile. We prescribe utilizing a dish brush (like the OXO "SteeL") over a customary wipe. Brushes – in contrast to permeable wipes – are effectively washed, dry out quicker, and enable you to both administer soap and clean with a solitary apparatus. Additionally use a perfect caddy, for example, one produced using treated steel, to keep the brush out of conceivably germ-substantial puddles amid its downtime. Concerning dish soap, you need a sort that cuts oil without leaving sulfates afterward. Here at Puracy, we're excited to have been named The Best Dish Soap You Can Purchase by Business Insider. They featured Puracy Dish Soap as "successful on oil, ok for the earth, and delicate staring you in the face"— also, it "cleans the most obstinate pots and skillet." The completing touch for your sink-side staples is that immortal powerhouse: Baking soda. This reasonable powder cuts scents and is effectively washed away with warm water. 5. Polish away, as needed Presently it's a great opportunity to get your sink looking as perfect as it really seems to be! If your sink is tempered steel, abstain from utilizing alkali, blanch, or grating cleaners. Rather, swing to baking soda (one more motivation to forget it). Sprinkle the sink with the powder and utilize a delicate wipe to tenderly clean. Finish with a light layer of mineral oil, connected with a reusable cloth. Take the shine back to a porcelain sink by fixing the inside with paper towels and splashing them with a fluid cleanser or vinegar. Abandon them in for thirty minutes, at that point dispose of and wash the sink with water. This likewise attempts to dispose of lime stores on spigots (simply line up by buffing with a dry paper towel). Stain expulsion for a sink is a brisk press away. Blend 1/some borax with the juice of a large portion of a lemon. Utilizing a wipe, rub the stain with the blend, and flush with running water. All around great. Your kitchen sink is there for you when you have to get a fast beverage of water, clean up in the wake of taking out the junk, and when you're all the while running out the entryway and brushing your teeth (hello, we've all been there). Dish it out some much-merited TLC with these delicate cleaning tips. |
Archives
February 2019
Categories |
 RSS Feed
