|
We're moving right along in the Specialty + Pantry. As a matter of fact the specialty side of the room is basically done. I'd like to purchase another seat but that is it! I made this sawhorse work area for about $35! Not very ratty and I truly like how it turned out. What's amusing is it really took more time to have my wood cut at Home Terminal that it did to assemble this work area. So easy! 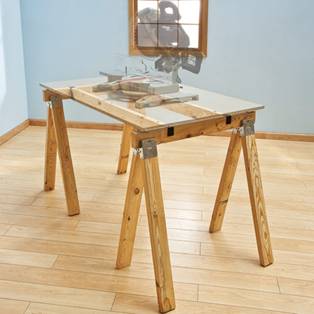 Alright, so first of all. I'm a terrible blogger and I neglected to take a preceding image of the storage room entryway I utilized at the best. I bought it at our nearby Habitat Reestablish for just $10. It fundamentally resembled this, but marginally beat up and with real gold equipment for sliding forward and backward:
It's 2ft wide and it was over 6ft tall, so we needed to cut a portion of the length off with our circular saw. Frankly, we cut more length off than I needed but uh oh! Despite everything it works. #reallife Truly, measure twice, cut once. When you cut you can't return individuals! I have picked this entryway since I cherished the gold equipment on it. I shower painted my entryway white using Valspar Paint + Preliminary I previously had on hand. I went to Home Stop and bought two arrangements of these sawhorse sections for $7 each. If you're keeping track I'm presently at $24 in the work area. Next I headed toward look at the 2 x 4's. I endeavored to purchase the straightest ones I could discover. You watch that by holding one end in your hand and putting it up to your eye while the opposite end lays on the floor. Close the other eye and look down the length of the board. Or on the other hand, you know, convey a dimension with you to the store 😉 I bought 4 of these at $2.72 each ( and now we're at $34.88 with some extra wood for an up and coming undertaking!) and had Rough (the most pleasant worker ever at Home Stop!!) cut them to measure for me. **Your size will rely upon how tall you need your work area to be. Mine is counter tallness. Ensure you represent the inches added to the stature by your sections and the cross piece of wood.** When home, I set up everything together in under 10 minutes, I'm not even Joking y'all, it's so easy. You open your stirred sawhorse sections and insert you cut 2 x 4 pieces. When you have the two legs done you include your cross piece in and crush the sections shut so the little teeth with clutch the wood. At that point get some wood screws and fill all the furnished holes with screws. So easy!! I realize I continue saying that but Without a doubt. I like easy!! I at that point laid my shower painted entryway over my sawhorses and utilized two little "L" sections to verify the best to the sawhorses. I utilized dark chalk paint to give the legs a plunged look but left the remainder of the wood crude. Also, Voila! DONE! I'm cherishing this space. It's so decent to have my crafts composed. I utilized some Direction Strips proposed for string Christmas lights that I found on leeway to keep my divider light fittings from hanging out behind the work area. This is an all out novice (or for my situation languid individual hee!hee!) venture. Anyone, ANYONE can make this work area! Do you think you'll give it a go? To know more visit here
0 Comments
Leave a Reply. |
Archives
February 2019
Categories |
 RSS Feed
